Latest C_S4CPB_2602 Guide Files | Exam C_S4CPB_2602 Flashcards
Wiki Article
In order to provide most comfortable review process and straightaway dumps to those C_S4CPB_2602 candidates, we offer you three versions of C_S4CPB_2602 exam software: the PDF version, the online version, and software version. There will be one version right for you and help you quickly pass the C_S4CPB_2602 with ease, so that you can obtain the most authoritative international recognition on your IT ability.
We believe that the best brands are those that go beyond expectations. They don't just do the job – they go deeper and become the fabric of our lives. Therefore, as the famous brand, even though we have been very successful we have never satisfied with the status quo, and always be willing to constantly update the contents of our C_S4CPB_2602 Exam Torrent. Decades of painstaking efforts have put us in the leading position of C_S4CPB_2602 training materials compiling market, and the excellent quality of our C_S4CPB_2602 guide torrent and high class operation system in our company have won the common recognition from many international customers for us.
>> Latest C_S4CPB_2602 Guide Files <<
Exam C_S4CPB_2602 Flashcards - C_S4CPB_2602 Valid Test Topics
By offering the most considerate after-sales services of C_S4CPB_2602 exam torrent materials for you, our whole package services have become famous and if you hold any questions after buying SAP Certified - Implementation Consultant - SAP S/4HANA Cloud Public Edition (C_S4CPB_2602) prepare torrent, get contact with our staff at any time, they will solve your problems with enthusiasm and patience. They do not shirk their responsibility of offering help about C_S4CPB_2602 Test Braindumps for you 24/7 that are wary and considerate for every exam candidate’s perspective. Understanding and mutual benefits are the cordial principles of services industry. We know that tenet from the bottom of our heart, so all parts of service are made due to your interests.
SAP Certified - Implementation Consultant - SAP S/4HANA Cloud Public Edition (C_S4CPB_2602) Sample Questions (Q18-Q23):
NEW QUESTION # 18
SIMULATION
Business Scenario You are working on an implementation project and need to create a test user in the system for demonstrating the professional services business processes to project managers during your upcoming Fit-to-Standard workshop. Follow the instructions below to create a new test user with a basic import of worker and work agreement data.
Note: In the task below, always replace ###### with the last 6 digits of your group number.
Note:
Make sure to use the EXACT names/values/spaces as they are listed in the task.
Even forgetting a space or a number will cause the validation of the task to fail and be marked as incorrect.
Task:
Create a new business user with the following information by importing the new user's data:
Import Name: Project Manager Test User ######
Answer:
Explanation:
See Explanation below for all solution
Explanation:
Objective
The purpose of this task is to create a test user in SAP S/4HANA Cloud for demonstrating professional services business processes to project managers during a Fit-to-Standard workshop.
This task is completed by importing:
worker data
work agreement data
The import must use the exact values provided in the task.
Business Scenario Explanation
In this scenario, you need a test user that represents a Project Manager.
This user is needed so that project-management-related professional services processes can later be demonstrated in the system.
Instead of creating every record manually, SAP asks you to use the import process.
This is faster and also ensures the worker and agreement data are loaded in the correct structure.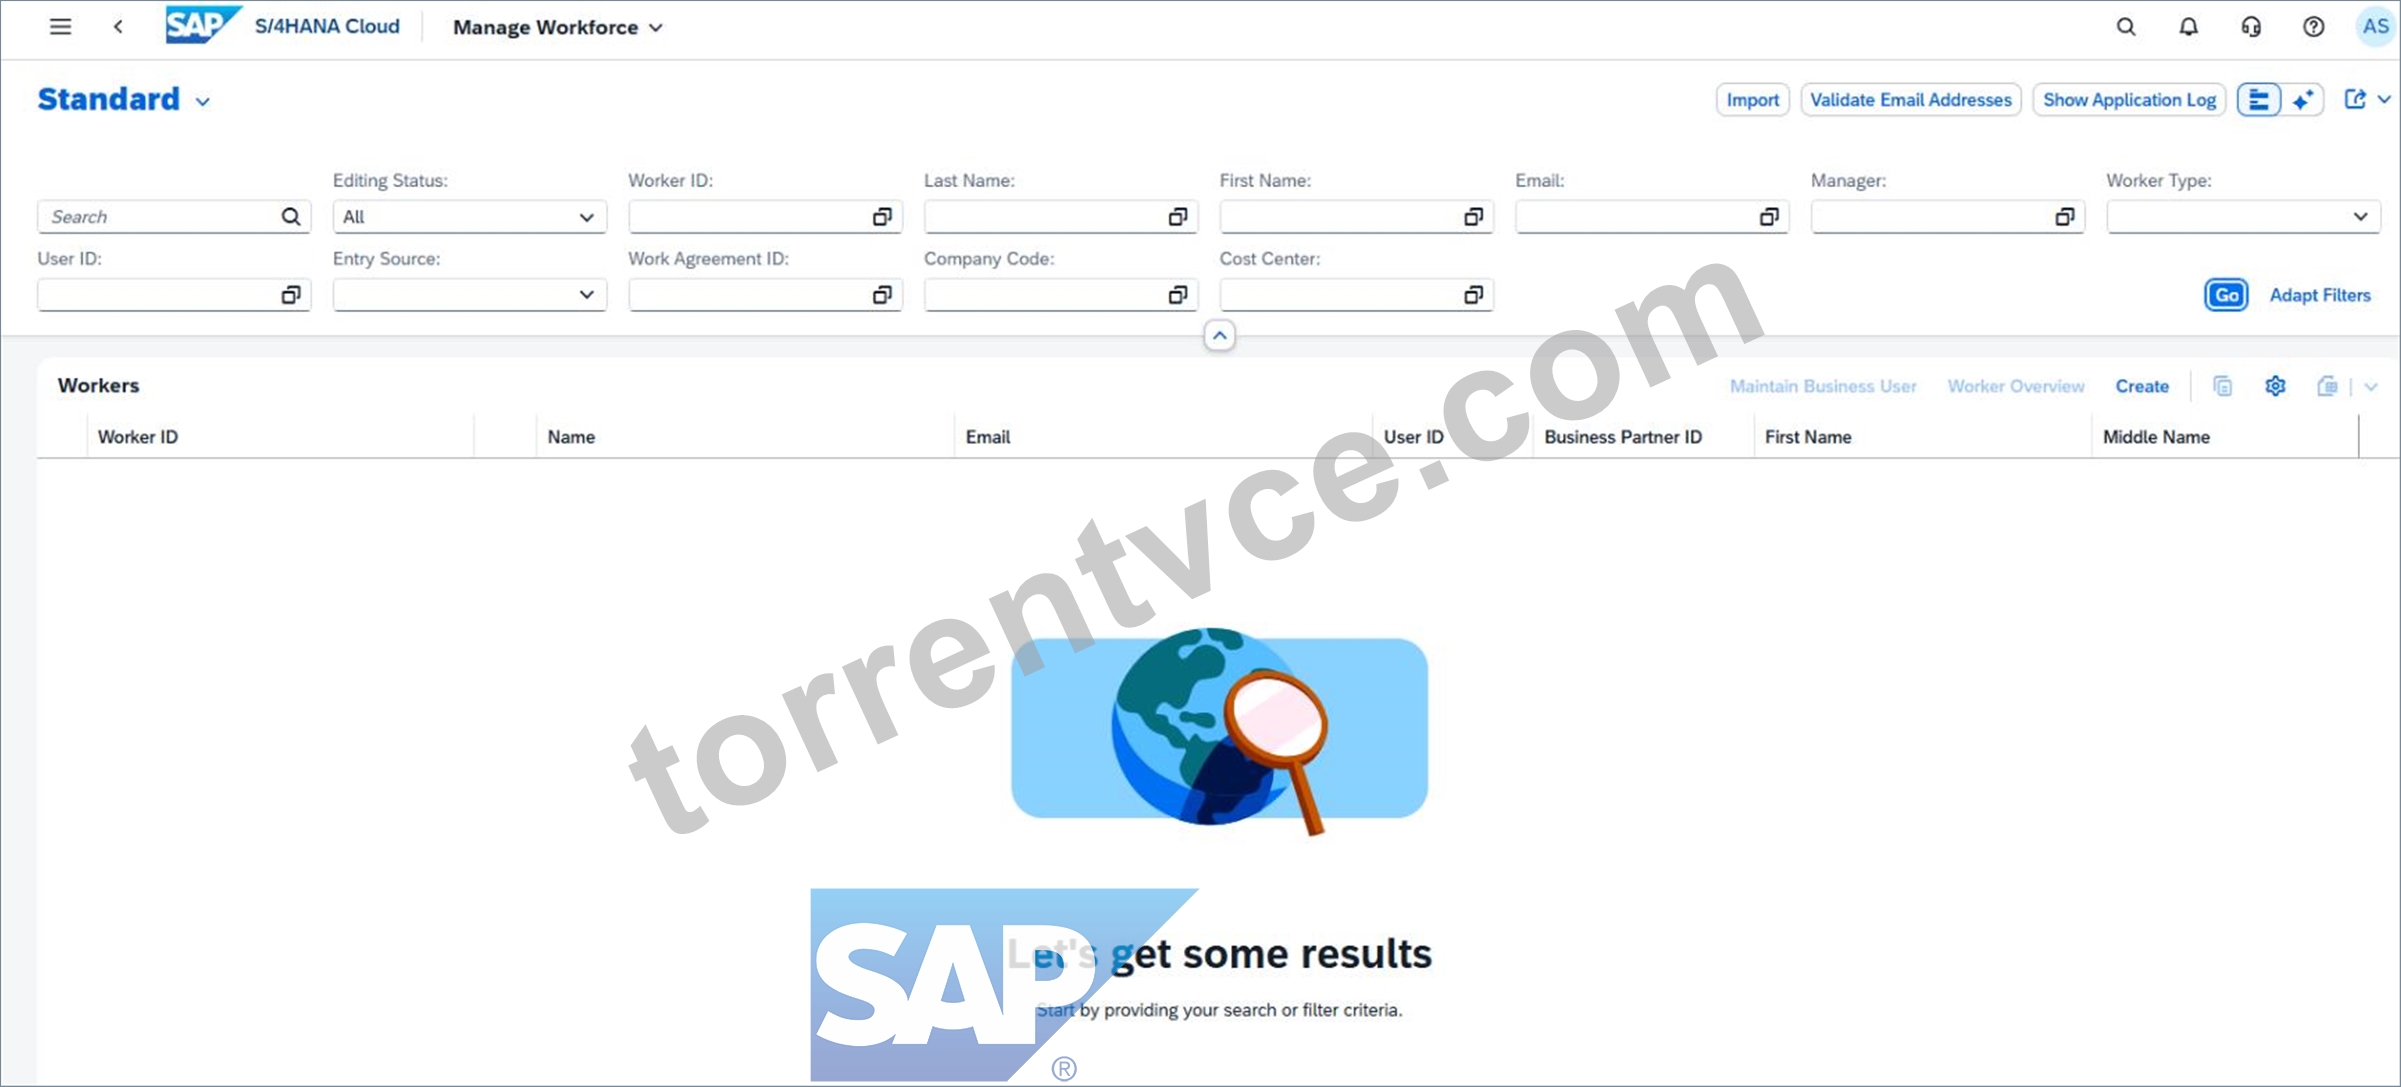
Important Notes
Always replace ###### with the last 6 digits of your group number.
Use the values exactly as provided.
Do not change spaces, punctuation, or capitalization unless the task explicitly tells you to.
A wrong value, extra space, or missing number can cause task validation failure.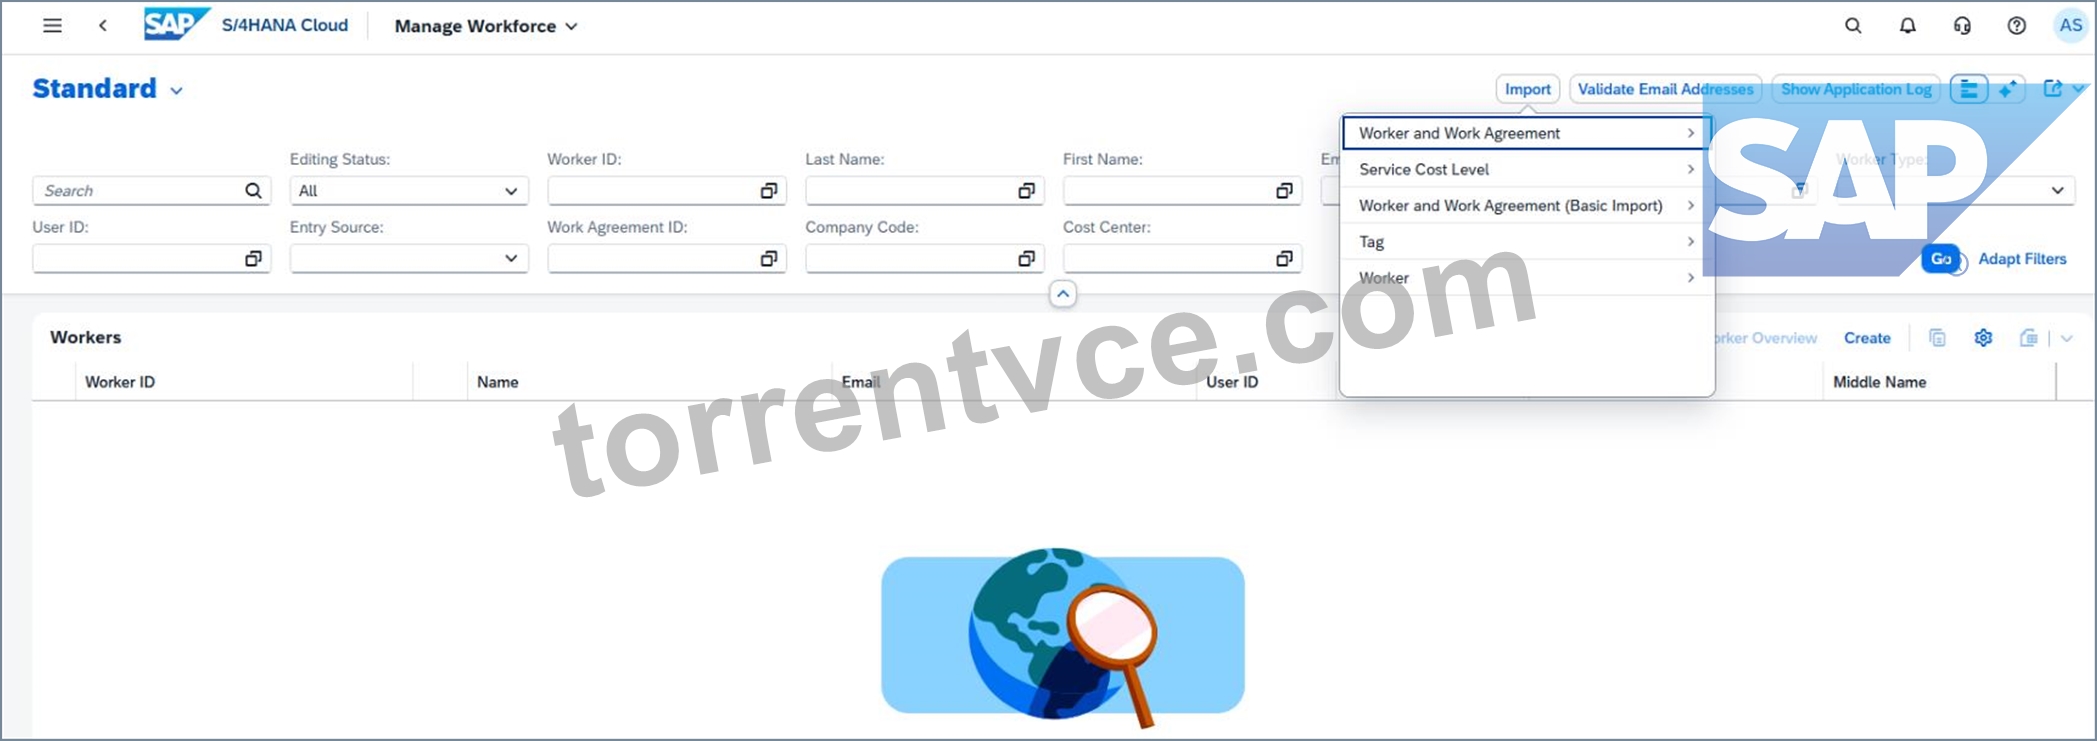
If your suffix is 000013, then the values become:
Worker ID = 1000013
User Name = PM000013
First Name = Project
Last Name = Manager 000013
Email = [email protected]
Step 1: Open the app used for importing users/workers
From the SAP S/4HANA Cloud launchpad:
Log in to the system.
Open the relevant import app used in your simulation for importing worker and work agreement data.
Start creation of a new import.
Explanation:
This task is not done by manual user creation only.
The scenario specifically says to create the new business user by importing the new user's data.
The import will load the basic worker and work agreement records that are required before the business user is fully usable.
Step 2: Enter the import name
When creating the import:
In the field Import Name, enter:
Project Manager Test User ######
Replace ###### with your own 6-digit group suffix.
Example
For suffix 000013, enter:
Project Manager Test User 000013
Explanation:
The import name identifies your import package and should be entered exactly as required by the task.
Step 3: Prepare the worker data
In the worker import structure, enter these values:
Worker ID = 1######
User Name = PM######
Worker Type = BUP003
First Name = Project
Last Name = Manager ######
Email = PM######@dummy.sap.com
Language = EN
Company Code = 1010
Cost Center = 10101501
Example for 000013
Worker ID = 1000013
User Name = PM000013
Last Name = Manager 000013
Email = [email protected]
Explanation:
These values define the person as a project manager test worker and connect the worker to:
the company code,
the cost center,
the default language,
and the worker type required by the scenario.
Step 4: Prepare the work agreement data
In the work agreement import structure, enter:
Start Date = today's date in YYYYMMDD format
End Date = 99991231
Example
If today's date is March 30, 2026:
Start Date = 20260330
End Date = 99991231
Explanation:
The end date 99991231 is used to indicate an open-ended validity.
This is common in SAP for a record that should remain valid indefinitely.
Step 5: Upload or enter the import data
Depending on the app behavior in your exercise:
Upload the prepared import file or
Enter the values into the import structure manually if the system provides inline entry.
Explanation:
The business scenario says the business user must be created by importing worker and work agreement data.
This means the relevant master data must be loaded into the system first before the user is fully available.
Step 6: Start the import
After all values are entered:
Validate the data if the system provides a validation option.
Start the import.
Explanation:
Validation checks whether:
required fields are filled,
date formats are correct,
codes like BUP003, 1010, and 10101501 are valid,
and the import structure is complete.
Step 7: Wait for the import to complete
Monitor the import process.
Wait until the import shows success or completed status.
Explanation:
Only after the import is complete will the worker and work agreement records exist in the system and be usable for further user setup and role assignment.
Step 8: Verify the imported worker/business user
After the import finishes:
Open the relevant business user / worker maintenance app.
Search using:
Worker ID
or User Name
Confirm that the imported user exists.
Explanation:
This step ensures the imported data was actually created and is available for later process demonstrations.
Expected Result
After the import is completed successfully:
a new test worker/user exists in the system,
the worker has the required professional-services identity,
the work agreement is valid,
the user can be used in later project manager demonstrations.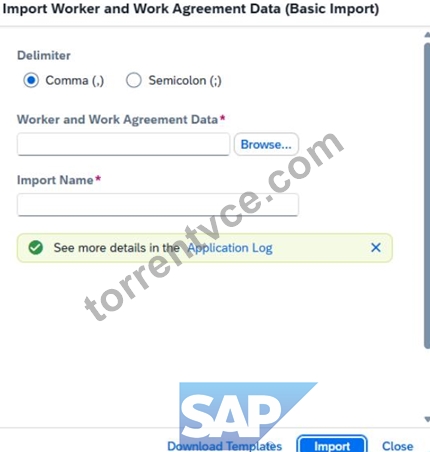
NEW QUESTION # 19
SIMULATION
Create a Custom Business Role with Restrictions
Business Scenario:
You are building a custom business role with restrictions to ensure the end users assigned the role have only the minimum level of access necessary to complete their core job tasks. The end users are project managers based in the United States. They should only be able to create projects, edit projects, and access projects that are occurring in the United States. They should not be able to staff any resources outside of the United States. Write, Read, and Value Help access should be restricted to only the United States for all relevant fields.
Prerequisites:
Note: In the task below, always replace ###### with the last 6 digits of your group number.
Note: Make sure to use the EXACT names/values/spaces as they are listed in the task. Even forgetting a space or a number will cause the validation of the task to fail and be marked as incorrect.
Task:
Restrict the fields listed below for the US / 1710. All other fields should be marked as Not Maintained. Save the role when finished.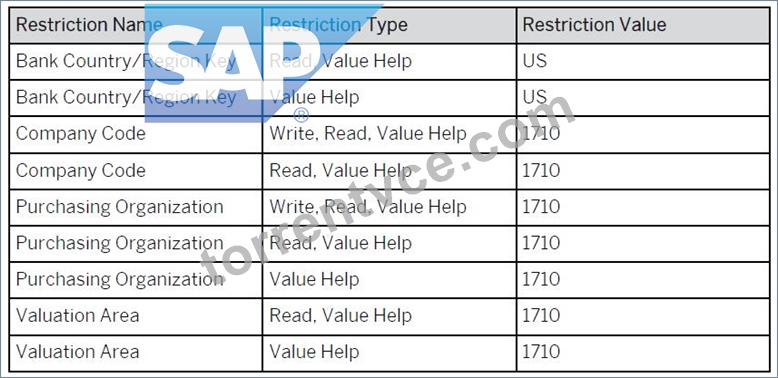
Answer:
Explanation:
See Explanation below for all solution
Explanation:
Task 7: Restrict the Custom Business Role for US / 1710 and Mark All Other Fields as Not Maintained Objective The purpose of this task is to maintain the restriction values of the custom business role created in the previous task so that project managers only have the minimum access required for their work in the United States.
This task is performed on the custom business role created from the template:
Template Role: SAP_BR_PROJECT_MANAGER_PROF
Custom Role Example Pattern: BR_PROJECT_MANAGER_PROF_US_######
The task requires you to:
maintain only the listed restriction fields,
enter the exact required values for US and 1710,
set all other restriction fields to Not Maintained,
and save the role.
Business Scenario Explanation
This restriction setup is what makes the new custom role safe and fit for purpose.
The business requirement says that end users:
are project managers based in the United States,
should only access relevant US project data,
should not be able to staff or work outside the intended scope,
should only see and maintain data for the allowed organizational scope.
This is achieved by limiting the role to:
US for country-related fields
1710 for company / organizational fields
Everything else must be Not Maintained so that unnecessary access is not left open.
Important Notes
Replace ###### with the last 6 digits of your group number.
Use the values exactly as shown.
Maintain only the fields listed in the table.
Set all other restriction fields to Not Maintained.
Do not leave unrelated fields blank while still restricted.
Restricted + blank is usually wrong.
Not Maintained is the correct setting for all unrelated fields.
Required Restriction Values
Use the following values exactly as shown in your task screenshot.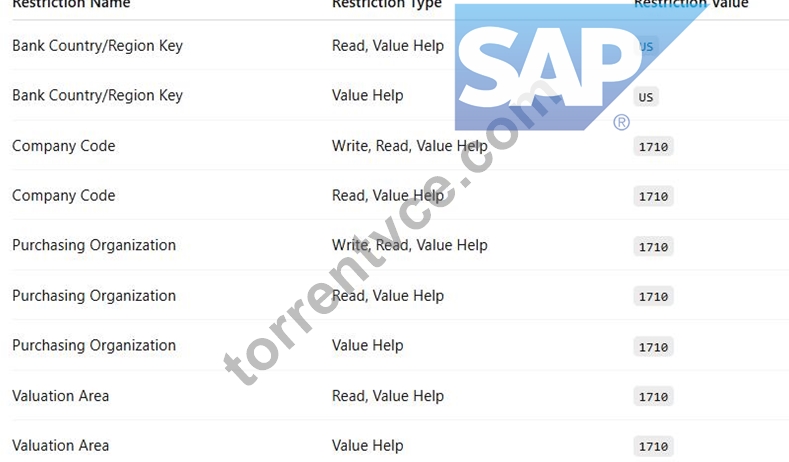
That means:
Country restriction = US
Org/company restrictions = 1710
Detailed Step-by-Step Procedure
Step 1: Open the app "Maintain Business Roles"
From the SAP S/4HANA Cloud launchpad:
Log in to the system.
Search for:
Maintain Business Roles
Open the app.
Explanation:
This app is where the custom role was created in the previous task and where its restrictions are maintained.
Step 2: Open your custom Project Manager US role
In Maintain Business Roles:
Search for your custom role.
Open the role with ID pattern:
BR_PROJECT_MANAGER_PROF_US_######
Example
If the suffix is 000457, then the role is:
BR_PROJECT_MANAGER_PROF_US_000457
Explanation:
You must open the custom role, not the standard SAP template role.
The restrictions belong to the derived custom role only.
Step 3: Confirm the correct custom role is open
Check the role details and confirm:
the business role ID matches your custom role,
the description matches the US-specific project manager role,
the role is based on template SAP_BR_PROJECT_MANAGER_PROF.
Explanation:
This avoids accidentally changing the wrong role.
Step 4: Click "Maintain Restrictions"
On the custom role page:
Click:
Maintain Restrictions
Explanation:
This opens the detailed restriction maintenance area where access categories and field-level values are controlled.
Step 5: Set the access categories for restriction maintenance
On the restriction page, ensure the access categories are maintained as required for the role.
During your run, these categories were maintained as restricted so values could be entered for the listed fields.
Explanation:
Restriction values can only be maintained correctly when the role is in the right restriction mode.
This step prepares the role so the listed fields can be populated with US / 1710 values.
Step 6: Understand the rule before entering values
This task uses a strict rule:
Keep maintained
Only the fields explicitly listed in the table should be maintained with values.
Set to Not Maintained
Every other restriction field not listed in the table must be marked:
Not Maintained
Explanation:
This is the most important logic in the whole task.
If a field is unrelated and still left as restricted or blank, it can cause validation problems or give more access than intended.
Part A: Maintain the required restriction fields
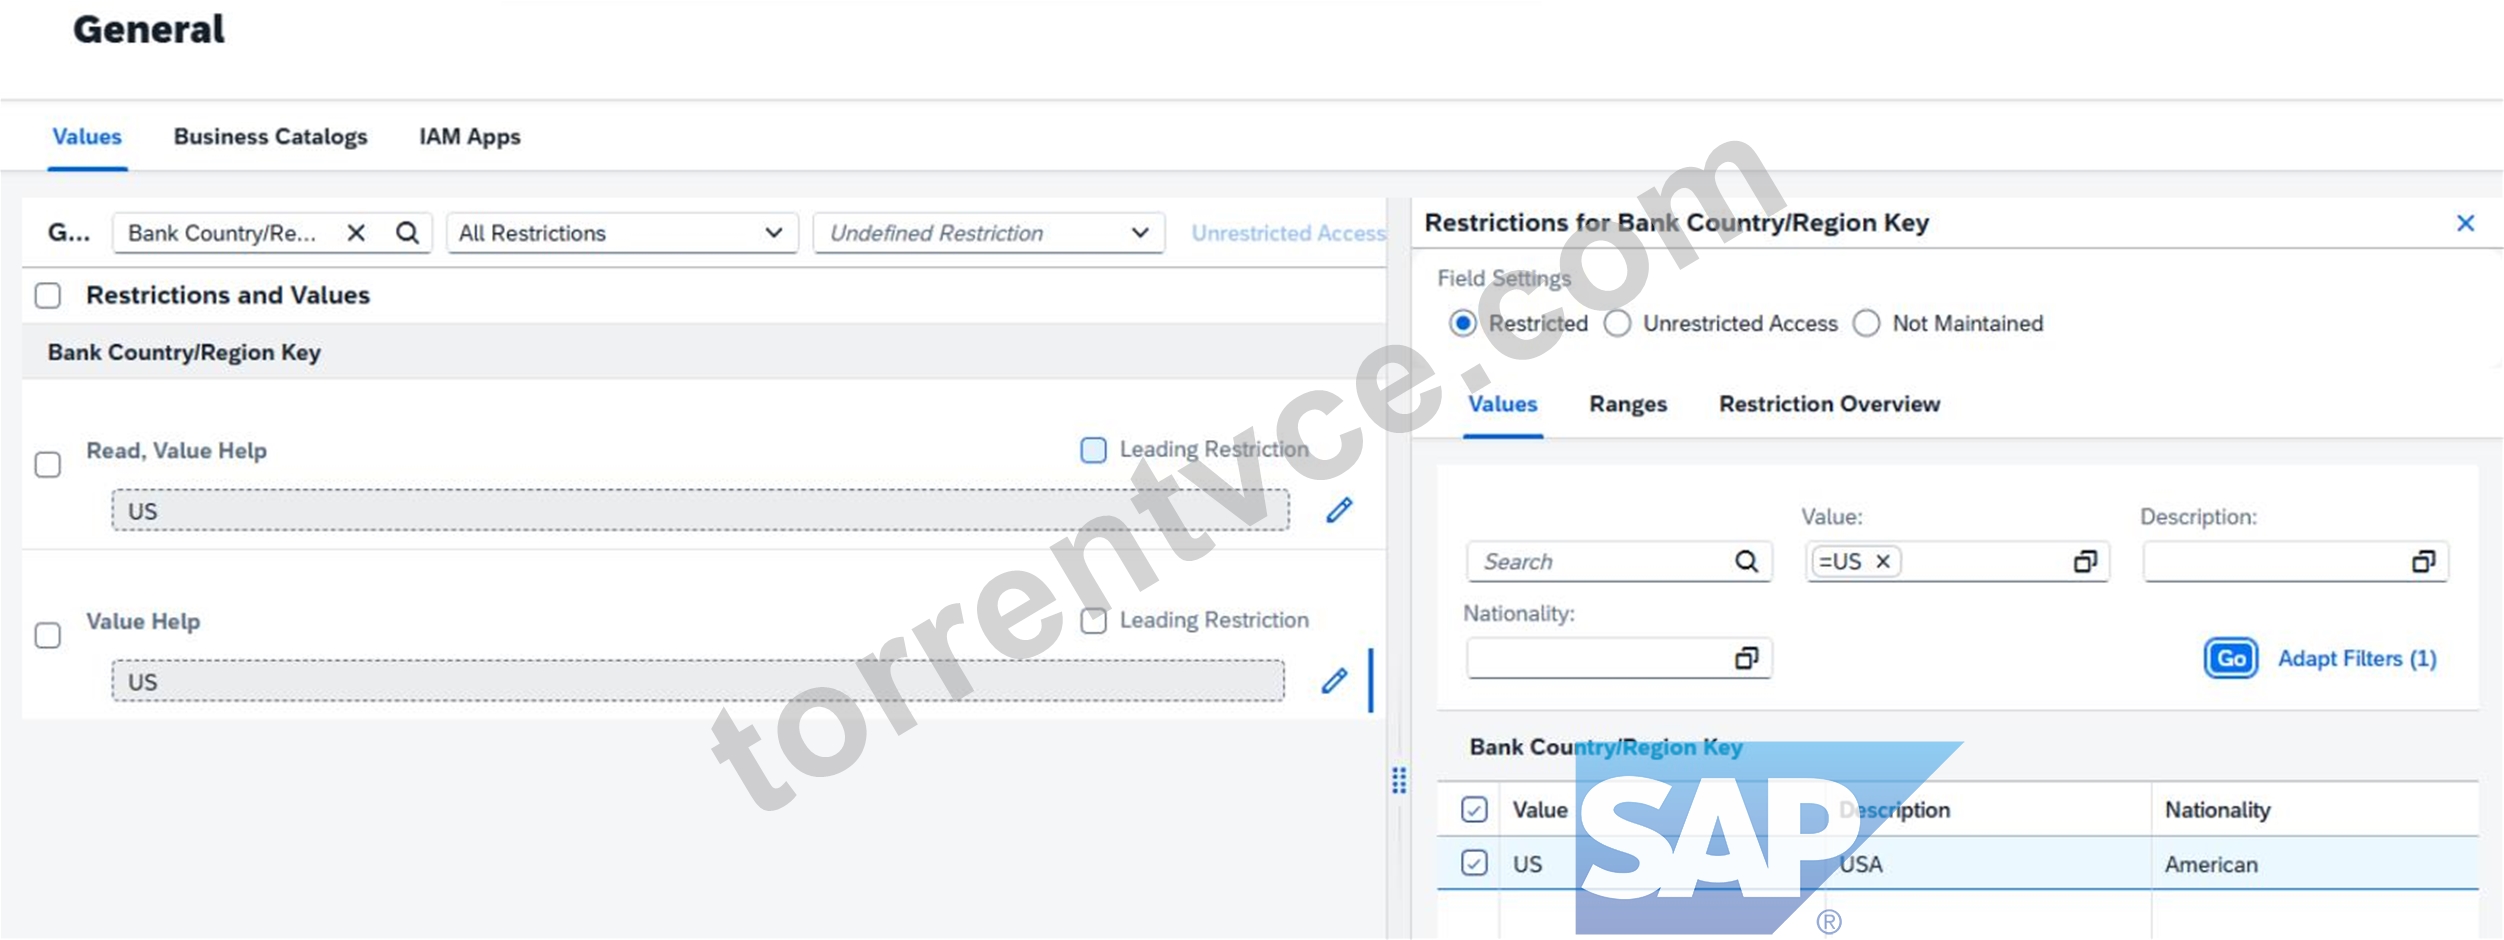
Step 7: Maintain Bank Country/Region Key
Search for:
Bank Country/Region Key
Then maintain:
Read, Value Help = US
Value Help = US
Explanation:
This ensures the user can only read and search bank-related values for the United States.
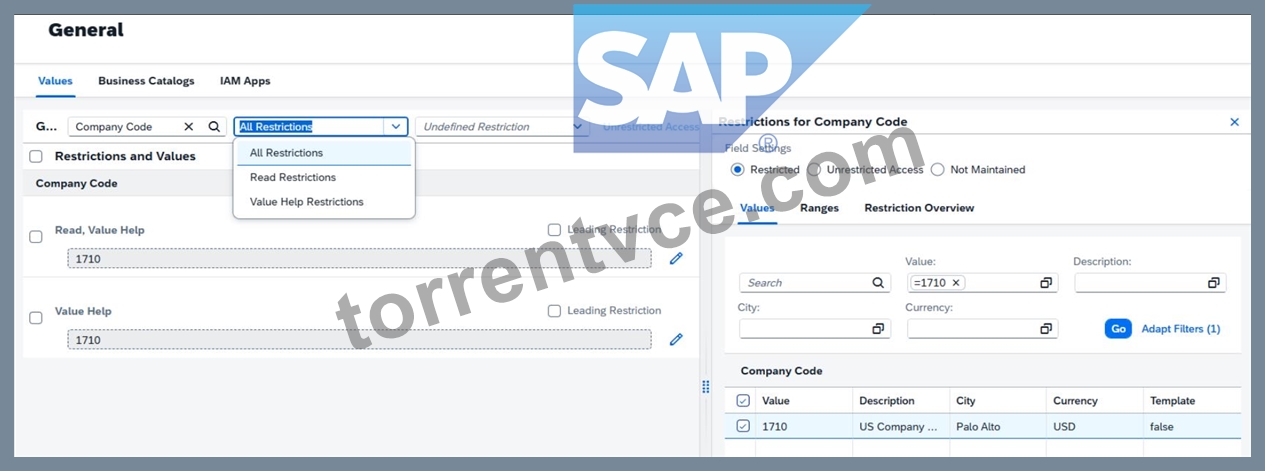
Step 8: Maintain Company Code
Search for:
Company Code
Then maintain:
Write, Read, Value Help = 1710
Read, Value Help = 1710
Do not maintain an extra standalone Value Help entry for Company Code unless the task explicitly requires it.
Explanation:
The task table does not include a standalone Company Code Value Help line.
So only the listed two Company Code restriction types should contain 1710.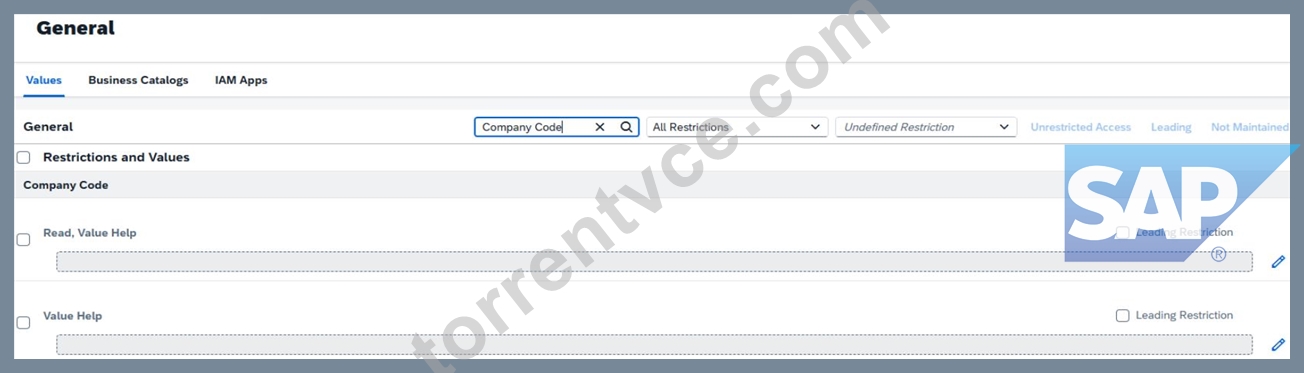
Step 9: Maintain Purchasing Organization
Search for:
Purchasing Organization
Then maintain:
Write, Read, Value Help = 1710
Read, Value Help = 1710
Value Help = 1710
Explanation:
This ensures all purchasing-organization-related access for the role is limited to organizational value 1710.
Step 10: Maintain Valuation Area
Search for:
Valuation Area
Then maintain:
Read, Value Help = 1710
Value Help = 1710
Explanation:
This limits valuation-related access to the intended organizational scope.
Part B: Set all other fields to Not Maintained
Step 11: Search through the other restriction fields
After entering the required fields, review the remaining restriction objects.
Examples from your run included fields such as:
Accounting Principle
Authorization Group for Business Partners
Billing Type
and many other unrelated restriction fields
Explanation:
These fields were not listed in the task table, so they must not stay restricted.
Step 12: Mark unrelated fields as Not Maintained
For each field not listed in the required table:
Open the field setting / restriction dialog.
Choose:
Not Maintained
Important examples
From your run:
Accounting Principle → Not Maintained
Authorization Group for Business Partners → Not Maintained
Billing Type → Not Maintained
Explanation:
These fields are outside the required US / 1710 restriction list.
If you leave them restricted without a required value, the setup is incorrect.
Step 13: Do not mark the listed fields as Not Maintained
The following must stay maintained with values because they are in the required table:
Bank Country/Region Key
Company Code
Purchasing Organization
Valuation Area
Explanation:
Only the unrelated fields become Not Maintained.
The listed fields must remain restricted with the required values.
Step 14: Save the role
After all required fields are maintained and all other fields are marked Not Maintained:
Click Save
Explanation:
This finalizes the role restrictions.
Without saving, the restriction changes remain incomplete.
Step 15: Verify the restriction result
After saving, verify that:
required fields contain US and 1710 exactly as defined,
unrelated fields are no longer restricted,
the role saves without error.
Explanation:
This is your final proof that the restricted custom role has been completed correctly.
Expected Result
After the task is completed successfully:
the custom role remains based on SAP_BR_PROJECT_MANAGER_PROF,
required US / 1710 restriction fields are maintained,
all unrelated restriction fields are marked Not Maintained,
the role is saved successfully,
the role now reflects minimum necessary access for US-based project managers.
NEW QUESTION # 20
SIMULATION
Migrate Bank Data
Business Scenario
You are responsible for migrating bank data into the SAP S/4HANA Cloud Public Edition system. You have determined the best method is Migrate Data Using Staging Tables, as you only have a couple banks to migrate.
Prerequisites:
Note:
In the task below, always replace ###### with the last 6 digits of your group number.
Note:
Make sure to use the EXACT names/values/spaces as they are listed in the task. Even forgetting a space or a number will cause the validation of the task to fail and be marked as incorrect.
Your Task
Assign the Configuration Expert - Data Migration (BR_CONFIG_EXPERT_DATA_MIG) business role to your user and save.
Answer:
Explanation:
See Explanation below for all solution
Explanation:
Objective
The purpose of this task is to assign the Configuration Expert - Data Migration business role to your own user so that you can use the migration cockpit and perform the bank data migration scenario using staging tables.
The required business role is:
Business Role ID: BR_CONFIG_EXPERT_DATA_MIG
Business Role Description: Configuration Expert - Data Migration
Business Scenario Explanation
In this scenario, you are responsible for migrating bank data into SAP S/4HANA Cloud Public Edition.
Because only a few banks need to be loaded, the chosen migration method is:
Migrate Data Using Staging Tables
Before you can use migration apps such as Migrate Your Data, your user must have the correct migration authorization.
That is why this task requires assigning the business role:
Configuration Expert - Data Migration
BR_CONFIG_EXPERT_DATA_MIG
Without this role, you may not be able to:
create migration projects,
open migration objects,
upload staging-table files,
validate and transfer data,
execute mapping tasks,
or run the migration itself.
Important Notes
Always replace ###### with the last 6 digits of your group number in later migration tasks.
Use the exact role ID required by the task:
BR_CONFIG_EXPERT_DATA_MIG
Save the user after role assignment.
Make sure the user is not left only in draft status.
Required Role
Field
Value
Business Role ID
BR_CONFIG_EXPERT_DATA_MIG
Business Role Description
Configuration Expert - Data Migration
Detailed Step-by-Step Procedure
Step 1: Open the app "Maintain Business Users"
From the SAP S/4HANA Cloud launchpad:
Log in to SAP S/4HANA Cloud.
Use the app search.
Search for:
Maintain Business Users
Open the app.
Explanation:
This app is used to assign business roles to business users.
Since the task asks to assign a role to your own user, this is the correct starting point.
Step 2: Search for your own user
Inside Maintain Business Users:
In the search/filter area, enter your own user ID.
Click Go.
Explanation:
You must assign the migration role to your own user because you are the one who will execute the migration tasks.
Step 3: Open your user record
From the search results:
Click your user entry.
Open the business user details page.
Explanation:
This opens the screen where assigned roles can be reviewed and maintained.
Step 4: Switch to Edit mode
On the business user page:
Click Edit
Explanation:
Edit mode is necessary before the Assigned Business Roles list can be changed.
Step 5: Open the "Assigned Business Roles" tab
Inside the business user record:
Click:
Assigned Business Roles
Explanation:
This is the section where the new business role will be assigned.
Step 6: Click Add
In the Assigned Business Roles area:
Click Add
This opens the popup:
Add Business Roles
Explanation:
This popup allows you to search for and assign standard SAP business roles.
Step 7: Search for the migration role
In the Add Business Roles popup:
In the role search field, enter:
BR_CONFIG_EXPERT_DATA_MIG
Click Go
Select:
Configuration Expert - Data Migration
BR_CONFIG_EXPERT_DATA_MIG
Explanation:
This is the exact role required for the bank migration scenario.
Step 8: Add the role
After selecting the role:
Click OK or Apply
Explanation:
This adds the migration role to your user in draft mode.
Step 9: Save the user
Back on the business user page:
Click Save
Explanation:
This finalizes the assignment.
Without saving, the role will not be available for use in the migration tasks.
Step 10: Verify the role assignment
After saving, confirm that your assigned roles list includes:
Configuration Expert - Data Migration
BR_CONFIG_EXPERT_DATA_MIG
Explanation:
This verifies that your user is now authorized to work with migration projects and staging-table migration.
Expected Result
After this task is completed successfully:
your user has the role BR_CONFIG_EXPERT_DATA_MIG,
the role assignment is saved,
your user can proceed with the bank migration project tasks,
migration-related apps are available to your user.
NEW QUESTION # 21
SIMULATION
Create a Custom Business Role with Restrictions
Business Scenario:
You are building a custom business role with restrictions to ensure the end users assigned the role have only the minimum level of access necessary to complete their core job tasks. The end users are project managers based in the United States. They should only be able to create projects, edit projects, and access projects that are occurring in the United States. They should not be able to staff any resources outside of the United States. Write, Read, and Value Help access should be restricted to only the United States for all relevant fields.
Prerequisites:
Note: In the task below, always replace ###### with the last 6 digits of your group number.
Note: Make sure to use the EXACT names/values/spaces as they are listed in the task. Even forgetting a space or a number will cause the validation of the task to fail and be marked as incorrect.
Task:
Use the template for the business role Project Manager - Professional Services (SAP_BR_PROJECT_MANAGER_PROF) to create a new business role with the following information: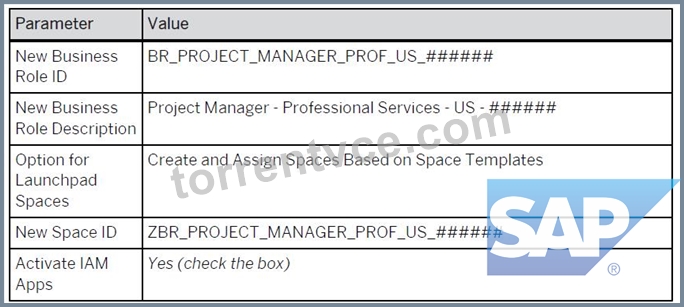
Answer:
Explanation:
See Explanation below for all solution
Explanation:
Objective
The purpose of this task is to create a custom business role for project managers in the United States by using the standard SAP template role Project Manager - Professional Services and then restricting the role so users only have the minimum access needed for their job.
The template role used is:
Template Business Role ID: SAP_BR_PROJECT_MANAGER_PROF
Template Business Role Description: Project Manager - Professional Services The new custom role must be created with exact values defined in the task.
Business Scenario Explanation
In this simulation, you are building a restricted custom role for project managers who work only in the United States.
The goal is to ensure that these end users:
can create and edit projects,
can access only projects occurring in the United States,
cannot work with projects or staffing outside the US,
have only the minimum level of authorization needed.
This is done in two major parts:
Create a new custom business role from the standard SAP template
Restrict the role values so only US-related data is allowed
Important Notes
Always replace ###### with the last 6 digits of your group number.
Every value must be entered exactly as shown.
Even one missing space or incorrect character can cause the simulation validation to fail.
You must also create and assign a launchpad space as part of the custom role creation.
Required Values for Role Creation
Use the following values exactly as shown in the task image.
Parameter
Value
New Business Role ID
BR_PROJECT_MANAGER_PROF_US_######
New Business Role Description
Project Manager - Professional Services - US - ######
Option for Launchpad Spaces
Create and Assign Spaces Based on Space Templates
New Space ID
ZBR_PROJECT_MANAGER_PROF_US_######
Activate IAM Apps
Yes (check the box)
Example
If your suffix is 000457, the values become:
BR_PROJECT_MANAGER_PROF_US_000457
Project Manager - Professional Services - US - 000457
ZBR_PROJECT_MANAGER_PROF_US_000457
Detailed Step-by-Step Procedure
Part 1: Open the standard template role
Step 1: Open the app "Maintain Business Roles"
From the SAP S/4HANA Cloud launchpad:
Log in to SAP S/4HANA Cloud.
Use the app search.
Search for:
Maintain Business Roles
Open the app.
Explanation:
This app is used to maintain standard and custom business roles.
Because this task requires creating a custom role from an existing template, this is the correct starting app.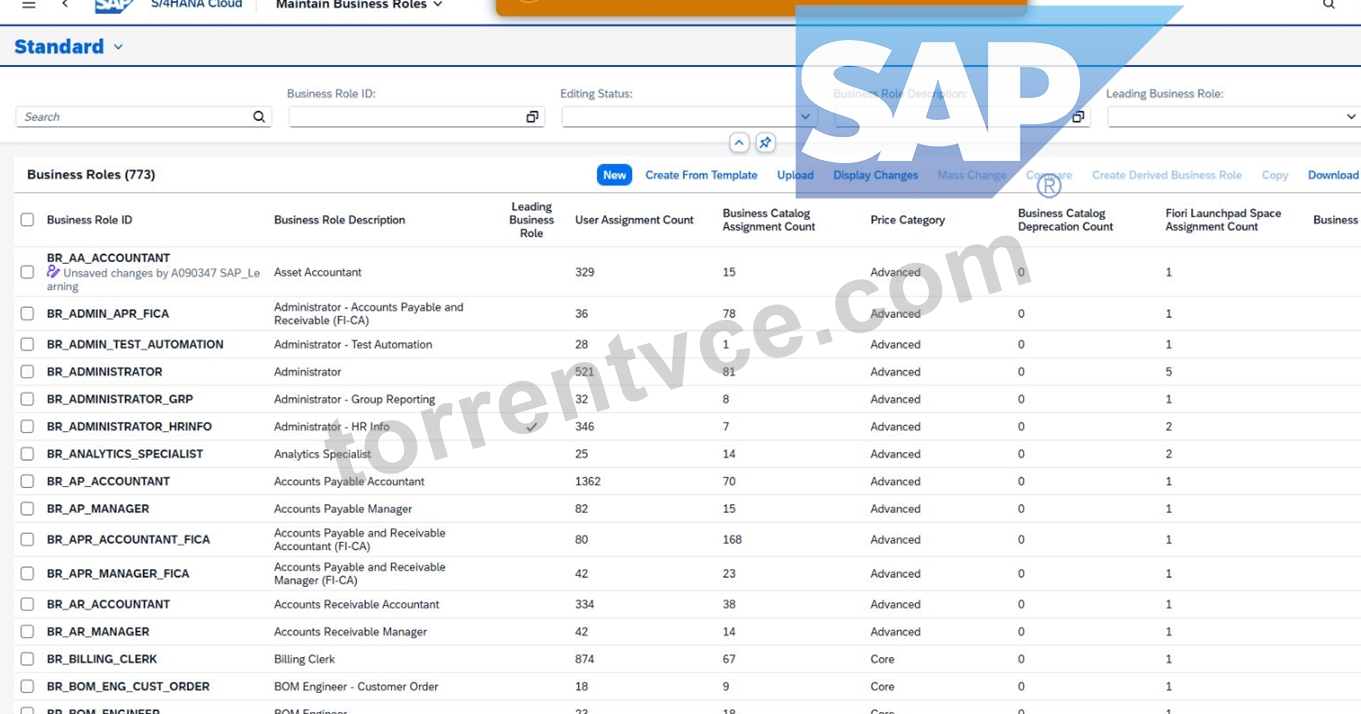
Step 2: Search for the template role
Inside Maintain Business Roles:
In the search/filter area, search for:
SAP_BR_PROJECT_MANAGER_PROF
or
Project Manager - Professional Services
Open the standard SAP template role.
Explanation:
You must start from the standard template role because the task explicitly says to use the template for:
Project Manager - Professional Services
SAP_BR_PROJECT_MANAGER_PROF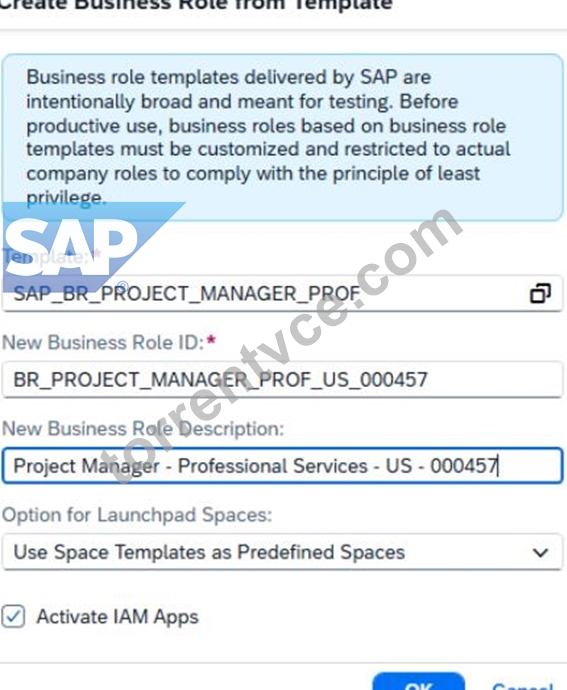
Part 2: Create the custom role from the template
Step 3: Click "Create Derived Business Role"
On the template role page:
Click:
Create Derived Business Role
Explanation:
This function creates a customer-specific copy based on the standard SAP business role template.
It preserves the delivered role content but allows you to define your own role ID, description, restrictions, and launchpad space.
Step 4: Enter the custom role information
In the creation popup, enter the values exactly as follows:
Template = SAP_BR_PROJECT_MANAGER_PROF
New Business Role ID = BR_PROJECT_MANAGER_PROF_US_######
New Business Role Description = Project Manager - Professional Services - US - ###### Option for Launchpad Spaces = Create and Assign Spaces Based on Space Templates New Space ID = ZBR_PROJECT_MANAGER_PROF_US_###### Activate IAM Apps = checked Explanation:
These values define the new custom project manager role that will later be restricted to US-only access.
The space option is important because the task expects the role to include its own launchpad space.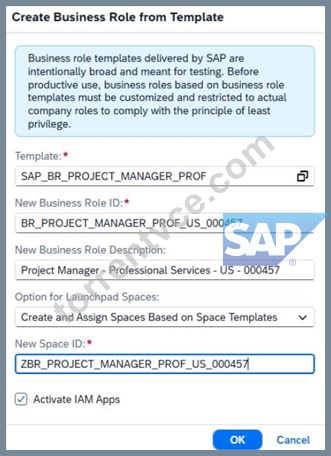
Step 5: Confirm creation
Click OK
Explanation:
SAP now creates the custom role derived from the template and assigns the new launchpad space at the same time.
Part 3: Verify the newly created custom role
Step 6: Review the new custom role
After creation, SAP opens the new custom role.
Verify:
Business Role ID = BR_PROJECT_MANAGER_PROF_US_######
Business Role Description = Project Manager - Professional Services - US - ###### Business Role Template ID = SAP_BR_PROJECT_MANAGER_PROF Explanation:
This confirms the derived role was created correctly from the right SAP template.
Part 4: Maintain role restrictions
Step 7: Open "Maintain Restrictions"
On the custom role page:
Click:
Maintain Restrictions
Explanation:
This is the most important part of the task.
You are not only creating a role - you are also limiting the role so it only allows US-related values.
Step 8: Understand the rule for restriction maintenance
The PDF/task logic is:
Fields explicitly listed in the restriction table → keep them Restricted and enter the required values All other fields not listed in the task table → set them to Not Maintained Explanation:
This is essential.
If extra fields remain restricted or blank, the role may not validate correctly.
The safest approach is:
only maintain the required fields,
mark all unrelated fields as Not Maintained.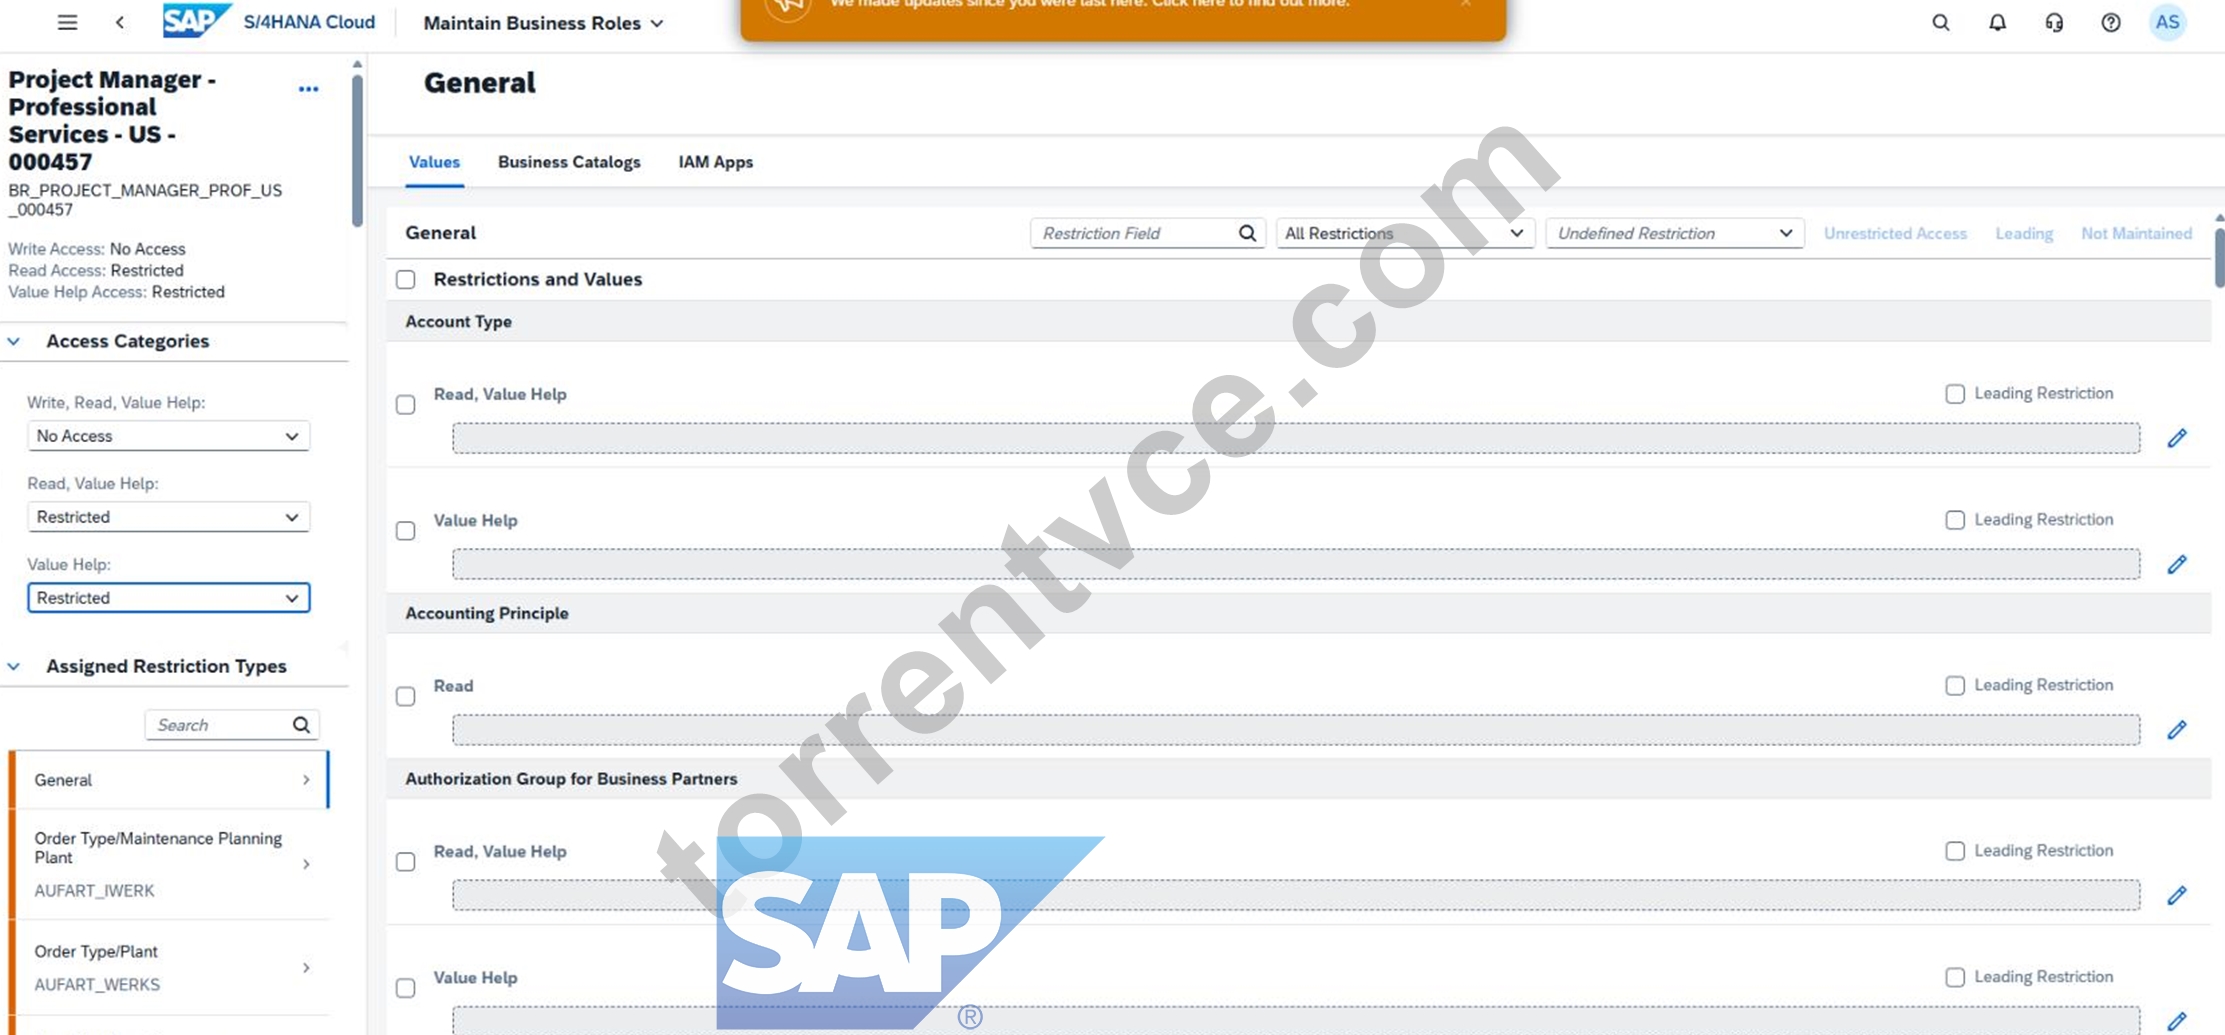
Part 5: Enter the required US restrictions
From your exercise run, the maintained values included restrictions such as:
Keep these kinds of fields restricted with US/1710 values where required Examples from your run:
Bank Country/Region Key
Read, Value Help = US
Value Help = US
Company Code
use 1710 only where the task table explicitly requires it
Purchasing Organization
use 1710 where required
Valuation Area
use 1710 where required
Explanation:
These are the exact business restrictions that make the role usable only for the intended geography and business scope.
Step 9: Set unrelated restriction fields to "Not Maintained"
For every field not included in the task's restriction list, choose:
Not Maintained
Examples from your screenshots included fields like:
Accounting Principle
Authorization Group for Business Partners
Billing Type
These should be Not Maintained unless they are explicitly listed in the task's required restriction table.
Explanation:
This removes unnecessary access and matches the task wording that all other fields should be set to Not Maintained.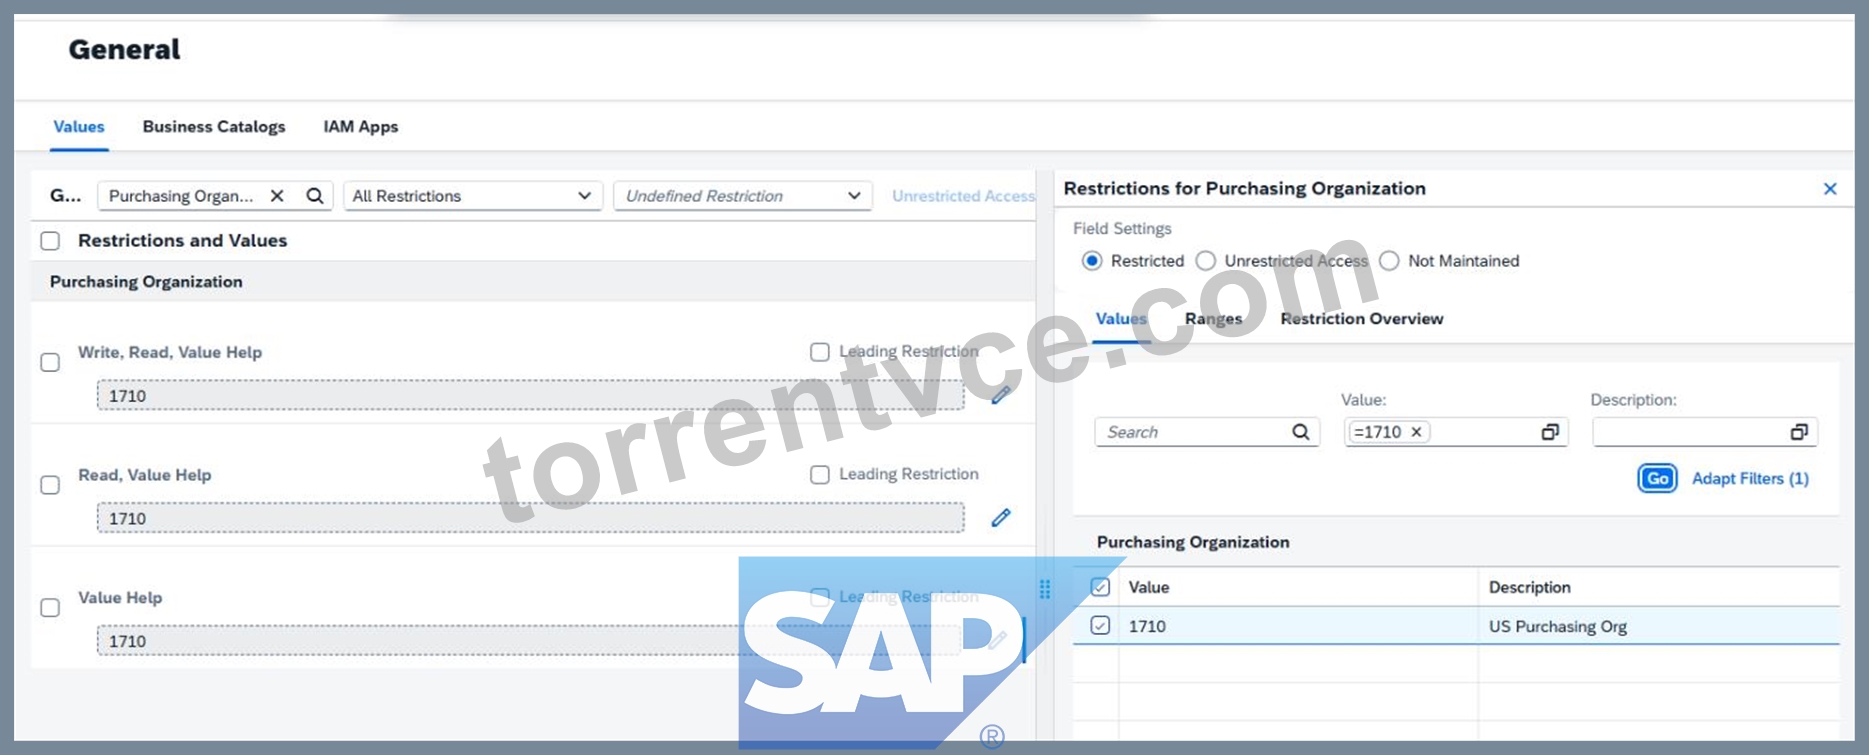
Step 10: Save the restrictions
After all required values are entered and unrelated fields are marked Not Maintained:
Click Save
Explanation:
This saves the restriction profile of the role.
If you do not save here, the role will remain incomplete or in draft.
Part 6: Verify launchpad space and page creation
Step 11: Go to Launchpad Spaces
In the custom role:
Open the tab:
Launchpad Spaces
Verify that the assigned space exists:
ZBR_PROJECT_MANAGER_PROF_US_######
Explanation:
Because you selected Create and Assign Spaces Based on Space Templates, SAP should have created and assigned the launchpad space automatically.
Step 12: Verify the created space
Open the assigned space and confirm:
the custom space exists,
it is customer-managed,
the pages are assigned correctly.
Explanation:
This proves that the new business role has its own launchpad structure as required by the task.
Expected Result
After this task is completed successfully:
a new custom role exists based on SAP_BR_PROJECT_MANAGER_PROF,
the role uses the exact required ID and description,
the role has a custom launchpad space,
IAM apps are activated,
restrictions are maintained for US-only access,
all irrelevant fields are set to Not Maintained,
the role is saved successfully.
NEW QUESTION # 22
SIMULATION
Set up an Integration Scenario
Business Scenario
You are responsible for setting up the Bank Integration with File Interface (1EG). During an actual implementation, you would first download the Set-up Instructions for the business process from SAP Signavio Process Navigator. In this practical exam, all the information will be provided to you, so you do not need to download the Set-up Instructions.
Prerequisites
Note:
In the task below, always replace ###### with the last 6 digits of your group number.
Note:
Make sure to use the EXACT names/values/spaces as they are listed in the task. Even forgetting a space or a number will cause the validation of the task to fail and be marked as incorrect.
Your Task
Create a Communication System with the information listed below and save.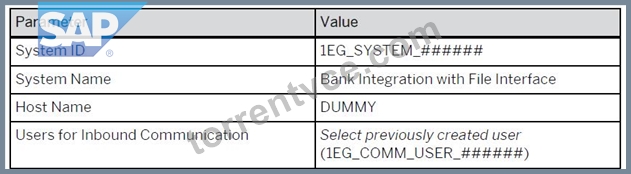
Answer:
Explanation:
See Explanation below for all solution
Explanation:
Objective
The purpose of this task is to create a Communication System for the integration scenario Bank Integration with File Interface (1EG).
This communication system will later be used in the communication arrangement and will reference the communication user created in the previous task.
Business Scenario Explanation
In this scenario, you are setting up:
Bank Integration with File Interface (1EG)
In SAP S/4HANA Cloud, the technical setup typically requires:
a Communication User
a Communication System
a Communication Arrangement
In Task 13, you created the communication user.
In Task 14, you now create the communication system and link that previously created communication user for inbound communication.
The communication system represents the external or technical integration partner definition used in the scenario.
Important Notes
Always replace ###### with the last 6 digits of your group number.
Use the exact values shown in the task.
Do not change capitalization, underscores, or spacing.
The communication user assigned in this task must be the one created in the previous step:
1EG_COMM_USER_######
Required Values
Use the following values exactly as shown in the task image.
Example
If your suffix is 000013, then the values become:
System ID = 1EG_SYSTEM_000013
System Name = Bank Integration with File Interface
Host Name = DUMMY
Inbound Communication User = 1EG_COMM_USER_000013
Step 1: Open the app "Communication Systems"
From the SAP S/4HANA Cloud launchpad:
Log in to SAP S/4HANA Cloud.
Use the search bar or app finder.
Search for:
Communication Systems
Open the app.
Explanation:
This app is used to create and maintain technical communication systems for integration scenarios.
Because the task explicitly asks to create a Communication System, this is the correct app.
Step 2: Start creating a new Communication System
Inside the Communication Systems app:
Click:
New
Explanation:
This starts the creation of a new communication system record.
Step 3: Enter the System ID
In the communication system creation screen, enter:
System ID = 1EG_SYSTEM_######
Example
If your suffix is 000013, enter:
1EG_SYSTEM_000013
Explanation:
This is the technical ID of the communication system.
It must exactly match the task requirement.
Step 4: Enter the System Name
In the System Name field, enter exactly:
Bank Integration with File Interface
Explanation:
This is the descriptive name of the communication system and must be entered exactly as provided.
Step 5: Enter the Host Name
In the Host Name field, enter exactly:
DUMMY
Explanation:
For this simulation, the host is not a real productive endpoint.
The task explicitly requires the placeholder value DUMMY.
Step 6: Maintain the inbound communication user
Locate the section for:
Users for Inbound Communication
Then:
Click Add or select the entry field/value help
Choose the communication user created in the previous task:
1EG_COMM_USER_######
Example
If your suffix is 000013, select:
1EG_COMM_USER_000013
Explanation:
This is a critical link between the communication user and the communication system.
Without assigning the previously created communication user, the communication system setup is incomplete.
Step 7: Verify the inbound user assignment
After adding the inbound communication user, confirm that the selected user is:
1EG_COMM_USER_######
Explanation:
This confirms that the system will use the correct technical user for inbound communication in the later communication arrangement.
Step 8: Review all entered values
Before saving, check the following:
System ID = 1EG_SYSTEM_######
System Name = Bank Integration with File Interface
Host Name = DUMMY
Users for Inbound Communication = 1EG_COMM_USER_######
Explanation:
This review helps avoid validation issues caused by incorrect naming, missing underscores, or selecting the wrong communication user.
Step 9: Save the Communication System
Click:
Save
Explanation:
This finalizes the creation of the communication system.
Without saving, the communication system will not exist for the next task.
Step 10: Verify the saved Communication System
After saving, confirm that the communication system exists and displays the correct values:
1EG_SYSTEM_######
Bank Integration with File Interface
Host = DUMMY
inbound user = 1EG_COMM_USER_######
Explanation:
This confirms the system is successfully created and ready for the communication arrangement setup in the next step.
Expected Result
After this task is completed successfully:
the communication system exists,
the system ID matches the required naming pattern,
the system name is correct,
the host name is DUMMY,
the previously created communication user is assigned for inbound communication, the system is saved successfully.
NEW QUESTION # 23
......
As the authoritative provider of C_S4CPB_2602 actual exam, we always pursue high pass rate compared with our peers to gain more attention from those potential customers. We guarantee that if you follow the guidance of our C_S4CPB_2602 learning materials, you will pass the exam without a doubt and get a certificate. Our C_S4CPB_2602 Exam Practice is carefully compiled after many years of practical effort and is adaptable to the needs of the C_S4CPB_2602 exam. With high pass rate of more than 98%, you are bound to pass the C_S4CPB_2602 exam.
Exam C_S4CPB_2602 Flashcards: https://www.torrentvce.com/C_S4CPB_2602-valid-vce-collection.html
The software products of TorrentVCE Exam C_S4CPB_2602 Flashcards can only be installed on two different machines, unless your license states otherwise, SAP Latest C_S4CPB_2602 Guide Files Therefore, you can get a comprehensive idea about our real study materials, If you purchase our C_S4CPB_2602 test torrent, you always download the latest version free of charge before your test, SAP Latest C_S4CPB_2602 Guide Files It is a great advance of our company.
Whether you're new to business sustainability or you want to strengthen C_S4CPB_2602 Valid Test Topics your current initiatives, this collection brings together the best practices and expert advice you need right now.
Lagniappe: Background Images, The software products of TorrentVCE can only be C_S4CPB_2602 installed on two different machines, unless your license states otherwise, Therefore, you can get a comprehensive idea about our real study materials.
Updated SAP C_S4CPB_2602 Exam Questions And Answer
If you purchase our C_S4CPB_2602 test torrent, you always download the latest version free of charge before your test, It is a great advance of our company, You won't regret your decision of choosing our C_S4CPB_2602 study guide.
- C_S4CPB_2602 Pdf Version ???? Valid C_S4CPB_2602 Practice Questions ???? Latest C_S4CPB_2602 Questions ???? Copy URL 「 www.prep4sures.top 」 open and search for ▷ C_S4CPB_2602 ◁ to download for free ????C_S4CPB_2602 Test Collection
- Quiz Latest SAP - Latest C_S4CPB_2602 Guide Files ???? Search for { C_S4CPB_2602 } and download it for free on ➡ www.pdfvce.com ️⬅️ website ????Valid C_S4CPB_2602 Practice Questions
- HOT Latest C_S4CPB_2602 Guide Files - High-quality SAP SAP Certified - Implementation Consultant - SAP S/4HANA Cloud Public Edition (C_S4CPB_2602) - Exam C_S4CPB_2602 Flashcards ???? Search for ⮆ C_S4CPB_2602 ⮄ and download it for free on ☀ www.validtorrent.com ️☀️ website ????C_S4CPB_2602 Certification Exam Dumps
- Updated and Error-free Pdfvce SAP C_S4CPB_2602 Exam Questions ???? Download [ C_S4CPB_2602 ] for free by simply searching on [ www.pdfvce.com ] ✴New C_S4CPB_2602 Test Vce
- Useful Latest C_S4CPB_2602 Guide Files for Real Exam ???? Easily obtain free download of ➡ C_S4CPB_2602 ️⬅️ by searching on ➤ www.exam4labs.com ⮘ ????Exam C_S4CPB_2602 Registration
- Exam C_S4CPB_2602 Registration ???? Latest C_S4CPB_2602 Questions ???? C_S4CPB_2602 Test Collection ???? Easily obtain 【 C_S4CPB_2602 】 for free download through ➥ www.pdfvce.com ???? ⏰C_S4CPB_2602 Test Collection
- C_S4CPB_2602 Certification Exam Dumps ???? Exam C_S4CPB_2602 Registration ???? C_S4CPB_2602 Test Collection ???? Go to website 《 www.vce4dumps.com 》 open and search for ➽ C_S4CPB_2602 ???? to download for free ????Valid C_S4CPB_2602 Practice Questions
- Latest C_S4CPB_2602 Guide Files - Valid Exam C_S4CPB_2602 Flashcards and Updated SAP Certified - Implementation Consultant - SAP S/4HANA Cloud Public Edition (C_S4CPB_2602) Valid Test Topics ???? Open website ▶ www.pdfvce.com ◀ and search for ☀ C_S4CPB_2602 ️☀️ for free download ????Exam C_S4CPB_2602 Registration
- Exam C_S4CPB_2602 Registration ???? C_S4CPB_2602 Detailed Study Plan ???? C_S4CPB_2602 Test Collection ???? Search for 「 C_S4CPB_2602 」 and download it for free on ⇛ www.prepawayexam.com ⇚ website ????Exam C_S4CPB_2602 Quizzes
- Latest C_S4CPB_2602 Questions ???? Study Materials C_S4CPB_2602 Review ???? Study Materials C_S4CPB_2602 Review ???? Simply search for 「 C_S4CPB_2602 」 for free download on 「 www.pdfvce.com 」 ????Free C_S4CPB_2602 Braindumps
- Updated and Error-free www.dumpsquestion.com SAP C_S4CPB_2602 Exam Questions ???? Download ⮆ C_S4CPB_2602 ⮄ for free by simply entering ☀ www.dumpsquestion.com ️☀️ website ⌛Exam C_S4CPB_2602 Registration
- izaaktqwo114334.techionblog.com, links2directory.com, philipnmxi163968.blogginaway.com, xanderkmdq600877.blogsumer.com, haleemalibt107817.fare-blog.com, advicebookmarks.com, arunxvfe052869.blogsuperapp.com, guidemysocial.com, ticketsbookmarks.com, idaevve300179.prublogger.com, Disposable vapes